JavaScript實(shí)現(xiàn)更換頭像功能
本文實(shí)例為大家分享了JavaScript實(shí)現(xiàn)更換頭像功能的具體代碼,供大家參考,具體內(nèi)容如下
最主要的是使用jquery的插件 cropper
1、基本使用步驟1.在 <head> 中導(dǎo)入 cropper.css 樣式表:
<link rel='stylesheet' href='http://m.baoyu77737.com/assets/lib/cropper/cropper.css' />
2.在 <body> 的結(jié)束標(biāo)簽之前,按順序?qū)肴缦碌?js 腳本:
<script src='https://rkxy.com.cn/assets/lib/jquery.js'></script><!-- 導(dǎo)入cropper的js腳本 --><script src='https://rkxy.com.cn/assets/lib/cropper/Cropper.js'></script><script src='https://rkxy.com.cn/assets/lib/cropper/jquery-cropper.js'></script>
3.定義如下的 HTML 結(jié)構(gòu):
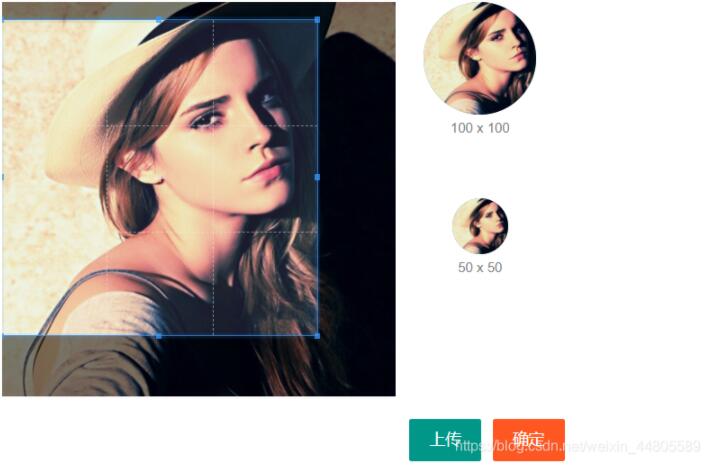
<!-- 第一行的圖片裁剪和預(yù)覽區(qū)域 --> <div class='row1'> <!-- 圖片裁剪區(qū)域 --> <div class='cropper-box'> <!-- 這個(gè) img 標(biāo)簽很重要,將來會(huì)把它初始化為裁剪區(qū)域 --> <img src='https://rkxy.com.cn/assets/images/sample.jpg' /> </div> <!-- 圖片的預(yù)覽區(qū)域 --> <div class='preview-box'> <div><!-- 寬高為 100px 的預(yù)覽區(qū)域 --><div class='img-preview w100'></div><p class='size'>100 x 100</p> </div> <div><!-- 寬高為 50px 的預(yù)覽區(qū)域 --><div class='img-preview w50'></div><p class='size'>50 x 50</p> </div></div> </div> <!-- 第二行的按鈕區(qū)域 --><div class='row2'> <button type='button' class='layui-btn'>上傳</button> <button type='button' class='layui-btn layui-btn-danger'>確定</button></div>
4.樣式CSS:
/* 設(shè)置卡片主體區(qū)域的寬度 */ .layui-card-body { width: 500px;} /* 設(shè)置按鈕行的樣式 */ .row2 { display: flex; justify-content: flex-end; margin-top: 20px;} /* 設(shè)置裁剪區(qū)域的樣式 */ .cropper-box { width: 350px; height: 350px; background-color: cyan; overflow: hidden;} /* 設(shè)置第一個(gè)預(yù)覽區(qū)域的樣式 */ .w100 { width: 100px; height: 100px; background-color: gray;} /* 設(shè)置第二個(gè)預(yù)覽區(qū)域的樣式 */ .w50 { width: 50px; height: 50px; background-color: gray; margin-top: 50px;} /* 設(shè)置預(yù)覽區(qū)域下方文本的樣式 */ .size { font-size: 12px; color: gray; text-align: center;} /* 設(shè)置圖片行的樣式 */ .row1 { display: flex;} /* 設(shè)置 preview-box 區(qū)域的的樣式 */ .preview-box { display: flex; flex-direction: column; flex: 1; align-items: center;} /* 設(shè)置 img-preview 區(qū)域的樣式 */ .img-preview { overflow: hidden; border-radius: 50%;}
5.導(dǎo)入自己的jS文件,并寫以下內(nèi)容,實(shí)現(xiàn)基本剪裁效果:
$(function() { // 1.1 獲取裁剪區(qū)域的 DOM 元素 var $image = $(’#image’); // 1.2 配置選項(xiàng) const options = {// 縱橫比aspectRatio: 1,// 指定預(yù)覽區(qū)域preview: ’.img-preview’ }; // 1.3 創(chuàng)建裁剪區(qū)域 $image.cropper(options);})
做完以上準(zhǔn)備工作,可以實(shí)現(xiàn)如下效果
1.添加上傳文件的輸入框,注意要把輸入框隱藏起來:
<!-- 第二行的按鈕區(qū)域 --><div class='row2'><!-- 通過 accept屬性,可以指定,允許用戶選擇什么類型的文件 --><input type='file' accept='image/png,image/jpeg' /><button type='button' id='btnChooseImage'>上傳</button><button type='button' id=’btnUpload’>確定</button></div>
2.為文件選擇框綁定change事件
// 為文件選擇框綁定 change事件// 只要選擇的文件發(fā)生變化就會(huì)觸發(fā)change事件$(’#file’).on(’change’, function(e) {// 獲取用戶選擇的文件var filelist = e.target.files;if (filelist.length === 0) { return layer.msg(’請選擇照片!’);}// 1.拿到用戶選擇的文件var file = e.target.files[0];// 2.將文件,轉(zhuǎn)化為路徑var imgURL = URL.createObjectURL(file);// 3.重新初始化剪裁區(qū)域$image .cropper(’destroy’) // 銷毀舊的裁剪區(qū)域 .attr(’src’, imgURL) // 重新設(shè)置圖片路徑 .cropper(options) // 重新初始化裁剪區(qū)域})
3.為確定按鈕綁定點(diǎn)擊事件
// 為確定按鈕,綁定點(diǎn)擊事件$(’#btnUpload’).on(’click’, function() { // 1.要拿到用戶剪裁之后的頭像var dataURL = $image .cropper(’getCroppedCanvas’, { // 創(chuàng)建一個(gè) Canvas 畫布width: 100,height: 100 }) .toDataURL(’image/png’) // 將 Canvas 畫布上的內(nèi)容,轉(zhuǎn)化為 base64 格式的字符串 // 2.調(diào)用接口,把頭像上傳到服務(wù)器$.ajax({ method: ’POST’, url: ’/my/update/avatar’, data: {avatar: dataURL }, success: function(res) {if (res.status !== 0) { return layer.msg(’更換頭像不成功!’);}layer.msg(’更換頭像成功!’);window.parent.getUserInfo(); } })
以上就是本文的全部內(nèi)容,希望對(duì)大家的學(xué)習(xí)有所幫助,也希望大家多多支持好吧啦網(wǎng)。
相關(guān)文章:
1. IntelliJ IDEA導(dǎo)入jar包的方法2. js實(shí)現(xiàn)跳一跳小游戲3. IDEA中用maven連接數(shù)據(jù)庫的教程4. JVM之class文件結(jié)構(gòu)5. js實(shí)現(xiàn)貪吃蛇小游戲(加墻)6. Python中Anaconda3 安裝gdal庫的方法7. asp.net core 認(rèn)證和授權(quán)實(shí)例詳解8. Python進(jìn)行統(tǒng)計(jì)建模9. python對(duì)批量WAV音頻進(jìn)行等長分割的方法實(shí)現(xiàn)10. CSS linear-gradient屬性案例詳解
 網(wǎng)公網(wǎng)安備