Android實(shí)現(xiàn)布局全屏
本文實(shí)例為大家分享了Android實(shí)現(xiàn)布局全屏的具體代碼,供大家參考,具體內(nèi)容如下
前言
類似Launcher,希望占用的布局鋪滿全屏,以調(diào)整狀態(tài)欄及虛擬按鍵部分的顏色樣式。
廢話不多說,上案例:
一、效果預(yù)覽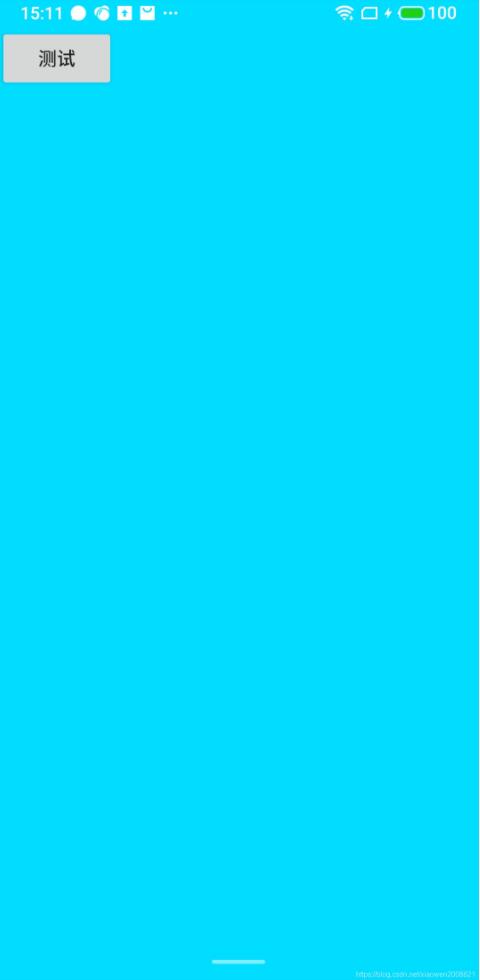
1.新建Android工程2.styles樣式增加
values 目錄的styles.xml添加如下樣式:
<style name='FullTheme' parent='@style/BaseFullTheme'></style><style name='BaseFullTheme' parent='@android:style/Theme.DeviceDefault.Light.NoActionBar'> <item name='android:windowBackground'>@android:color/transparent</item> <item name='android:colorBackgroundCacheHint'>@null</item> <item name='android:windowShowWallpaper'>true</item> <item name='android:windowNoTitle'>true</item></style>
alues-v19 目錄的styles.xml添加如下樣式:
<style name='FullTheme' parent='@style/BaseFullTheme'> <item name='android:windowTranslucentStatus'>true</item> <item name='android:windowTranslucentNavigation'>true</item></style>
values-v21目錄的styles.xml添加如下樣式:
<style name='FullTheme' parent='@style/BaseFullTheme'> <item name='android:windowTranslucentStatus'>false</item> <item name='android:windowTranslucentNavigation'>false</item> <item name='android:windowDrawsSystemBarBackgrounds'>true</item> <item name='android:statusBarColor'>#00000000</item> <item name='android:navigationBarColor'>#00000000</item></style>
values-v29目錄的styles.xml添加如下樣式:
<style name='FullTheme' parent='@style/BaseFullTheme'> <item name='android:colorBackgroundCacheHint'>@null</item> <item name='android:colorEdgeEffect'>#FF757575</item> <item name='android:windowActionBar'>false</item> <item name='android:windowBackground'>@android:color/transparent</item> <item name='android:windowNoTitle'>true</item> <item name='android:windowShowWallpaper'>true</item> <item name='android:windowLayoutInDisplayCutoutMode'>shortEdges</item> <item name='android:enforceStatusBarContrast'>false</item> <item name='android:enforceNavigationBarContrast'>false</item> <item name='android:windowTranslucentStatus'>false</item> <item name='android:windowTranslucentNavigation'>false</item> <item name='android:windowDrawsSystemBarBackgrounds'>true</item> <item name='android:statusBarColor'>#00000000</item> <item name='android:navigationBarColor'>#00000000</item></style>3.布局
layout目錄建立activity_main.xml
<?xml version='1.0' encoding='utf-8'?><LinearLayout xmlns:android='http://schemas.android.com/apk/res/android' xmlns:tools='http://schemas.android.com/tools' android:layout_width='match_parent' android:layout_height='match_parent' android:orientation='vertical' android:background='@android:color/holo_blue_bright'<!-- 測(cè)試設(shè)置的顏色 --> android:fitsSystemWindows='true' tools:context='.MainActivity'> <Buttonandroid: android:layout_width='wrap_content'android:layout_height='wrap_content'android:text='測(cè)試'> </Button></LinearLayout>4.使用
新建MainActivity.java
package com.demo;import android.app.Activity;import android.graphics.Color;import android.os.Build;import android.os.Bundle;import android.view.View;import android.view.Window;import android.view.WindowManager;public class MainActivity extends Activity { @Override protected void onCreate(Bundle savedInstanceState) {super.onCreate(savedInstanceState);hideStatusBarNavigationBar();setContentView(R.layout.activity_main); } //關(guān)鍵方法 private void hideStatusBarNavigationBar() {if (Build.VERSION.SDK_INT >= Build.VERSION_CODES.LOLLIPOP) { Window window = getWindow(); window.clearFlags(WindowManager.LayoutParams.FLAG_TRANSLUCENT_STATUS | WindowManager.LayoutParams.FLAG_TRANSLUCENT_NAVIGATION); window.getDecorView().setSystemUiVisibility(View.SYSTEM_UI_FLAG_LAYOUT_FULLSCREEN | View.SYSTEM_UI_FLAG_LAYOUT_HIDE_NAVIGATION | View.SYSTEM_UI_FLAG_LAYOUT_STABLE); window.addFlags(WindowManager.LayoutParams.FLAG_DRAWS_SYSTEM_BAR_BACKGROUNDS); window.setStatusBarColor(Color.TRANSPARENT); window.setNavigationBarColor(Color.TRANSPARENT); return;}if (Build.VERSION.SDK_INT >= Build.VERSION_CODES.KITKAT) { getWindow().addFlags( WindowManager.LayoutParams.FLAG_TRANSLUCENT_STATUS); getWindow().addFlags( WindowManager.LayoutParams.FLAG_TRANSLUCENT_NAVIGATION);} }}
AndroidManifest.xml聲明
<?xml version='1.0' encoding='utf-8'?><manifest xmlns:android='http://schemas.android.com/apk/res/android' package='com.demo'> <applicationandroid:allowBackup='true'android:icon='@mipmap/ic_launcher'android:label='@string/app_name'android:roundIcon='@mipmap/ic_launcher_round'android:supportsRtl='true'android:theme='@style/FullTheme'><activity android:name='.MainActivity'> <intent-filter><action android:name='android.intent.action.MAIN' /><category android:name='android.intent.category.LAUNCHER' /> </intent-filter></activity> </application></manifest>
finish
三、填坑:fitsSystemWindows之坑在activity_main.xml中的根布局那增加了android:fitsSystemWindows=“true”,如果不增加這個(gè)屬性,子view的布局會(huì)從最頂上開始,有興趣的可以修改了試試。
以上就是本文的全部?jī)?nèi)容,希望對(duì)大家的學(xué)習(xí)有所幫助,也希望大家多多支持好吧啦網(wǎng)。
相關(guān)文章:
1. python實(shí)現(xiàn)讀取類別頻數(shù)數(shù)據(jù)畫水平條形圖案例2. python中PyQuery庫用法分享3. python操作數(shù)據(jù)庫獲取結(jié)果之fetchone和fetchall的區(qū)別說明4. CSS3實(shí)現(xiàn)動(dòng)態(tài)翻牌效果 仿百度貼吧3D翻牌一次動(dòng)畫特效5. 使用css實(shí)現(xiàn)全兼容tooltip提示框6. Python編寫nmap掃描工具7. JavaScript實(shí)現(xiàn)組件化和模塊化方法詳解8. .NET6打包部署到Windows Service的全過程9. ASP動(dòng)態(tài)網(wǎng)頁制作技術(shù)經(jīng)驗(yàn)分享10. ASP.NET MVC前臺(tái)動(dòng)態(tài)添加文本框并在后臺(tái)使用FormCollection接收值
 網(wǎng)公網(wǎng)安備